In January, I made a strategic business decision to close my Cafe Press and move all my POD (print on demand) designs to Zazzle. At the time of this writing, 99% of my designs have been moved over... a feat in itself since they all had to be reformatted to fit the new platform and templates... The last few designs specifically made for www.Aruba-Sunsets.com will be transitioning in April.
It was a big decision that I did not take lightly. For the last few years, I have had designs on both sites but with really needed to consolidate my efforts. I mean, with my handmade (Etsy) store taking off, plus freelance jobs, and all my other irons in the fire, my free time is precious. I work hard on all my art and designs. Listing them needs to be easy. I have no patience for complicated interfaces that are difficult to navigate and a K2 sized learning curve.
Closing my Cafe Press and focusing on my Zazzle Stores made sense for me. My store wasn't getting the traffic it needed from the marketplace shoppers, and the royalty on designs is limited and controlled by Cafe Press. So, my ROI at just wasn't cutting mustard.
After using both sites, I find Zazzle's store interface easier and more user friendly and I have more control over my designs and royalties. Also, a big selling point for Zazzle is that I can use vector images!
I did my due diligence and I compared product and print quality because I didn't want to compromise on quality products. Both sold the same or similar quality products, and the printing of both companies were very good!
In the future, I may also consider using Redbubble if I feel their demographics are a good fit for my customers. But for now, I am focusing my print-on-demand efforts on my Zazzle stores.
Friday, March 30, 2018
Sunday, October 22, 2017
Fun with Watercolor Class - Tower de Eiffel
It was an absolute pleasure to have these lovely ladies in my Fun with Watercolor Class this afternoon. Look at these fabulous artists! Thank you for sharing the afternoon with me, and creating these amazing paintings! BEAUTIFUL!!!
I hope everyone had as much fun learning as I did teaching it. Every single one of you painted a masterpiece that should be framed and proudly displayed! I also hope that I was able to inspire you to continue exploring the creative possibilities of watercolor painting and build on the techniques you learned today. Set your inner artist free!
I hope everyone had as much fun learning as I did teaching it. Every single one of you painted a masterpiece that should be framed and proudly displayed! I also hope that I was able to inspire you to continue exploring the creative possibilities of watercolor painting and build on the techniques you learned today. Set your inner artist free!
 |
| Right to Left: Dottie Davis, Janna Scarborough and Ellen Harbin-Dabbs at Generations Emporium and Spiritual Community Center in Johnson City, TN. |
Good Quality Watercolor Paper
A good quality watercolor paper makes all the difference!
Both paintings were made by me, using the same techniques, same paint, same brushes... the only change was the paper. Notice how, in the bottom picture, the wet into wet pigment pools and creates uneven toned grainy splotches when dry. The water also caused pilling of the paper, like someone used an eraser too hard.
Both papers are 140 lb, cold press, watercolor paper. The top one is Strathmore 400 series. The bottom one is Canson XL (for watercolors). I won't be buying that again.

Friday, July 14, 2017
Cacti and the Caribbean Ocean
My latest painting... Cacti & Caribbean. This is one of my favorites...Designed for Aruba-Sunsets.com, it will appear on postcards, mugs and other Aruba-Sunsets brand merchandise very soon.


Monday, October 3, 2016
Fundamental Watercolor Techniques - October 12, 1-3pm or 6-8pm
Fundamental Watercolor Techniques - October 12, 1-3pm or 6-8pm
On October 12th I will be teaching Watercolor Fundamentals. There will be an afternoon class (1:00 pm - 3:00 pm)and an evening class (6:00 pm - 8:00 pm). The evening class is no longer available.
$20 holds your seat!
AFTERNOON CLASS
You will follow along with your instructor, and explore, hands on, basic watercolor techniques with a local watercolor artist, whose works have been on display at several galleries in the tri-cities area.
We will also be discussing kinds of watercolor paints, different watercolor papers, and various brushes.
On October 12th I will be holding 2 Watercolor classes. One in the afternoon and one in the evening.
You will leave with a better understanding of the medium, and your own 8x10 painting.
Space is limited for this very popular workshop.
Young Adults Welcome.
The cost for this 2 hour workshop is $25 for instruction plus $20 materials fee.
A deposit of $20 will secure your seat. The outstanding balance is do the day of class.
Please email me to sign up.
McCarronArtDesign@gmail.co
I accept payment via paypal
https://www.paypal.me/
You can also stop by ArtCurious Gallary, (2362 Boones Creek Rd., Johnson City, TN) and Aleta will be happy to assist you. Just let her know that you are interested in the watercolor workshop. Be sure to check out her other class offerings, and the beautiful artwork while you're there.
On October 12th I will be teaching Watercolor Fundamentals. There will be an afternoon class (1:00 pm - 3:00 pm)
$20 holds your seat!
AFTERNOON CLASS
You will follow along with your instructor, and explore, hands on, basic watercolor techniques with a local watercolor artist, whose works have been on display at several galleries in the tri-cities area.
We will also be discussing kinds of watercolor paints, different watercolor papers, and various brushes.
On October 12th I will be holding 2 Watercolor classes. One in the afternoon and one in the evening.
You will leave with a better understanding of the medium, and your own 8x10 painting.
Space is limited for this very popular workshop.
Young Adults Welcome.
The cost for this 2 hour workshop is $25 for instruction plus $20 materials fee.
A deposit of $20 will secure your seat. The outstanding balance is do the day of class.
Please email me to sign up.
McCarronArtDesign@gmail.co
I accept payment via paypal
https://www.paypal.me/
You can also stop by ArtCurious Gallary, (2362 Boones Creek Rd., Johnson City, TN) and Aleta will be happy to assist you. Just let her know that you are interested in the watercolor workshop. Be sure to check out her other class offerings, and the beautiful artwork while you're there.
Thursday, August 25, 2016
I just have to rant a little bit to my artist friends. I am super excited about my Watercolor workshop next month. I taught art to Jr.High and HS kids back in college as an intern with a wonderful artist and mentor Jean LaChance (Her blog --> http://studiojeanne216.blogspot.com/) but, then I graduated and went on to persue other things.
I am teaching this class for a few reasons.

I want to keep the class affordable for everyone. But, I got a few FB messages after my event post was published, wanting to know the quality of the brushes and paint that were included in the supplies. They implied that I was ripping people off and a $20 class fee was too high for 2 hours, a pan of paints, and a few nylon brushes!!! I had replied nicely to one of the messages, that it was a BASIC class for BEGINNERS. I will be teaching some simple techniques using several styles of brushes (included in the price) and then putting those techniques to practical use by composing a painting on good watercolor paper (also included in the price of the class.) But, if he had a BETTER paint set or BETTER brushes that he would like to learn how to use properly, please bring them with him to the workshop, but he was still required to pay the $20 for the class.
For the record... After the rental cost of the space, the brushes, watercolor paper, the inexpensive paint set, paper towels, and other items no one thinks about... i.e. cups for water, plates for pallets, etc. I will be lucky to break even after this class. This is a community event that I am doing from the kindness of my heart, to encourage creativity and promote the arts in the Tri-Cities area.
I told myself not to let it get to me...BUT IT DID! I was up last night thinking about it, and getting angry, and then pissed, and worried that these haters would convince others that I was cheating them or some other such nonsense. So, now I rant, rave and vent.... and let it go!
ohmmmmmmmmmmmmmm! Serenity now!
I am teaching this class for a few reasons.
- I welcome the opportunity to overcome my glossophobia - just a big word meaning fear of speaking in public.
- I love watercolors. I enjoy creating with all kinds of mediums - oil, pastels, acrylics, ink, pencils, chalk, you name it, I used it! But, watercolors are my favorite and I want to spark that passion in others
- Watercolors are fun, easy to use, and, compared to other art forms, fairly inexpensive to get started with them.

I want to keep the class affordable for everyone. But, I got a few FB messages after my event post was published, wanting to know the quality of the brushes and paint that were included in the supplies. They implied that I was ripping people off and a $20 class fee was too high for 2 hours, a pan of paints, and a few nylon brushes!!! I had replied nicely to one of the messages, that it was a BASIC class for BEGINNERS. I will be teaching some simple techniques using several styles of brushes (included in the price) and then putting those techniques to practical use by composing a painting on good watercolor paper (also included in the price of the class.) But, if he had a BETTER paint set or BETTER brushes that he would like to learn how to use properly, please bring them with him to the workshop, but he was still required to pay the $20 for the class.
For the record... After the rental cost of the space, the brushes, watercolor paper, the inexpensive paint set, paper towels, and other items no one thinks about... i.e. cups for water, plates for pallets, etc. I will be lucky to break even after this class. This is a community event that I am doing from the kindness of my heart, to encourage creativity and promote the arts in the Tri-Cities area.
I told myself not to let it get to me...BUT IT DID! I was up last night thinking about it, and getting angry, and then pissed, and worried that these haters would convince others that I was cheating them or some other such nonsense. So, now I rant, rave and vent.... and let it go!
ohmmmmmmmmmmmmmm! Serenity now!
Tuesday, February 2, 2016
Self Portrait in Watercolors
After finishing the Heron,
I needed some inspiration for my next painting. I started looking at my
art history books, and paintings of the old masters. Specifically the
artist's self portraits.
Almost every artist, from "great masters of the Renaissance" to Modern Artists, whether he/she was known for their landscapes, still lifes, people, abstracts or something else, did some sort of self portrait.
I had done a self portrait drawing years and years ago, Looking back on it, after I just recently rented the movie "Big Eyes", I my have been somehow subconsciously channeling my inner Margaret Keane, although I knew nothing about her or her work back then. Interesting!
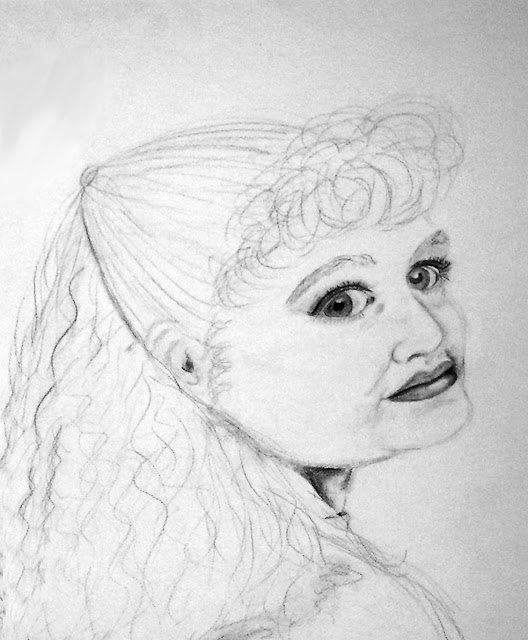
Drawing and painting PEOPLE has never been my strong suit. But, I did just say I wanted to try something new, although, sitting in front of a mirror, painting myself definitely does not appeal to me. Then it occurred to me... these historical artists were simply taking a selfie using the tools of the time, before cameras or more accurately cell phone cameras.
So....
Using the modern tools I have available to me, I took a selfie....
Using that selfie...Placing complimentary colors next to each other makes shadows and highlights "pop".

And here is the final result...

This is my new BRAND Profile Picture. I love it!
Friday, December 11, 2015
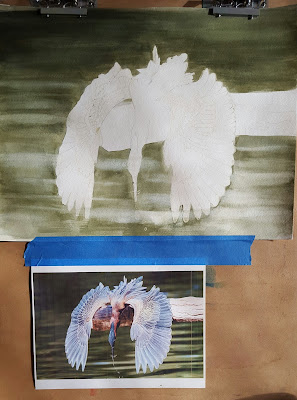
Green Heron, Watercolor
This next project is being painted with permission from the photographer, Peggy Coleman.
A good friend of mine saw this award winning photo on line and asked if
I could paint it for her. It is a green heron. They are not very big,
but from this photo and the way the wings are spread out, you would
think they are enormous.
I have had several people mention that they liked seeing the progression of the painting like I did with my painting of Canal St. So, I have decided to keep doing it.
Here is what I have so far.


I have had several people mention that they liked seeing the progression of the painting like I did with my painting of Canal St. So, I have decided to keep doing it.
Here is what I have so far.

It
took me a while to mask out all those feathers to keep those beautiful
light highlights that they are know for. And the green water with the
reflective ripple effect... not my strong suit.
But, I think its pretty darn good so far.
Update: 1/25/16
I finished this painting this past weekend. Here is the project in pictures...
I started by practicing painting feathers...

Here is the sketch with the liquid mask on the white part of the wings.

I started with the green "Swampy"water background.

First layer of color on the bird...

Darker layer of color...

Mask removed, details touched up, and signed.

Tuesday, October 20, 2015
Progress of my Canal Street Painting
Canal Street Trolley, NOLA
10" x 8" Watercolor

Above is the final painting. Below, you can see the progress as it is completed.
This is the progress of a painting I have been working on for the last few weeks. (In this busy world, I set aside Friday mornings to get together with some friends and paint. So, some paintings that could probably be finished in a day or two, take me a few weeks.)
In September, my husband and I vacationed in the city of New Orleans. What an amazing place. The history, architecture, music! My husband, a budding photographer, took his DSLR everywhere, and I have been helping him "process" the 2000 + photos using Lightroom and Photoshop. One of my favorite shots was a photo of the Canal Street Trolley in the distance. The sun was starting to set, and casting pink and gold glow on the buildings. The famous street lamps of New Orleans where just coming on, and the city was becoming more active after the daytime heat.
I decided to paint that scene.
I originally posted it on my Facebook page, here...www.facebook.com/KimMcCarronArtDesign
But to my shock, I found out that some of my friends (yes, people my age) still don't have a Facebook account! So, I was asked to post them on my blog too.
After drawing this composition out, I made the mistake of starting with the lamp posts since they were such a prominent feature in this painting, So I am forced to work the background around them. Not an easy task in watercolors. the black/indigo keeps bleeding into what ever I paint around it. However, I just learned a cool "hack" around this dilemma. Carefully coat JUST the lampposts with Modge Podge! It will repel water and watercolor once it dries completely! HOWEVER once I did this, I can not CHANGE them, i.e. fade them out, or add additional color to them. Such is the price for not planning past the initial sketch!
Next time I hope to finish up the left hand side buildings, cars and people. Stay tuned!
.... DONE... See the finished painting at the top of the post.
10" x 8" Watercolor

Above is the final painting. Below, you can see the progress as it is completed.
This is the progress of a painting I have been working on for the last few weeks. (In this busy world, I set aside Friday mornings to get together with some friends and paint. So, some paintings that could probably be finished in a day or two, take me a few weeks.)
In September, my husband and I vacationed in the city of New Orleans. What an amazing place. The history, architecture, music! My husband, a budding photographer, took his DSLR everywhere, and I have been helping him "process" the 2000 + photos using Lightroom and Photoshop. One of my favorite shots was a photo of the Canal Street Trolley in the distance. The sun was starting to set, and casting pink and gold glow on the buildings. The famous street lamps of New Orleans where just coming on, and the city was becoming more active after the daytime heat.
I decided to paint that scene.
I originally posted it on my Facebook page, here...www.facebook.com/KimMcCarronArtDesign
But to my shock, I found out that some of my friends (yes, people my age) still don't have a Facebook account! So, I was asked to post them on my blog too.
 |
| Perspective Sketch of the trolley, buildings and lamps. I used masking fluid to protect the light points. |
 |
 |
| I added the tops of the trees, and people getting off the trolley. I also underpainted the shadows of the storefronts on the right hand side. |
 |
| More details to the trees, and storefronts on the right. |
.... DONE... See the finished painting at the top of the post.
Thursday, October 15, 2015
New Embossing Machine
I am so excited! Here's why...
I had been wanting an embosser for a while and had done the homework.
There are 2 big name competitors when it comes to (folder) embossing. (Not to be confused with powder/heat embossing.)
The Sizzix Big Shot has a wider opening that lets you use larger embossing folders like the 5" x 7" size, and it also is big enough to take large die cut dies, However it was too large for my tiny crafting space and limited storage space. It also came with a fairly big price tag too.
The Sizzix Texture Boutique was small and simple. It uses the standard A2 embossing folders (4.5" x 5.75" (Large enough to do the entire front of a note card.)
The Cricut Cuttlebug can accommodate the A2 and the larger 5" x 7" folders like the Big Shot, but it is not quite as big and bulky.
I had decided that for my needs, the Texture Boutique would work just fine. So, I had been keeping my eyes peeled for holiday sales.
A few weeks ago, I saw an e-mail from my local Stampin' Up! demonstrator mentioning the sale going on to make room for all the new holiday scrapbooking and stamping kits. And the Stampin' up version of the Sizzix Texture Boutique was on clearance! I got a SWEET DEAL - less than $25 even with shipping!
But, when my Boutique arrived in the mail a few days later, I realized that I had no folders to test it out with. Thankfully a friend and fellow crafter, Liz Carlin, let me come by her craft studio, and "play" with her folders and die cuts. I brought paper scraps and my embosser, and she had a huge storage bin of folders!
I am going to use this one on a flip card I'm putting together for Halloween. I tried adding some black sparkles but then changed my mind. (I haven't removed them all in this picture, as you can see.) I think it might look really cool with BLACK card stock as the base.

Well, that was 2 weeks ago. Since then, I have been scouring the the internet for deals on A2 embossing folders. My eBay find just arrived from Canada today.
It is a two folder set: Dots/Zigzags and Flowers.
I tried them out on a few different papers that I have. The first is a heavy 140 lb professional watercolor paper. (I had some small pieces that I had used to "practice" a wet into wet blending technique before applying it to a large painting. They were completely dry and had been sitting there just waiting for me to figure out what to do with them.)
The other two are Canson 98 lb mix media paper scraps. One is plain the other I used a chalk pastel to emphasize the embossing image.

Unfortunately, embossing does not make for good photography. You can't really see the texture here. Especially not on the thicker painted watercolor paper. Take my word for it, they are great!
I also found another deal on eBay a few nights ago. That one should get here early next week.
I'll post more pics then. Please be sure to check out Liz's crafting blog too. (CraftItWithLiz.wordpress.com) She is so creative with so many different materials! Until next time...Keep Calm and Keep Crafting!
I had been wanting an embosser for a while and had done the homework.
There are 2 big name competitors when it comes to (folder) embossing. (Not to be confused with powder/heat embossing.)
- Sizzix -
- Big Shot
- Texture Boutique
- Cricut
- Cuttlebug
The Sizzix Big Shot has a wider opening that lets you use larger embossing folders like the 5" x 7" size, and it also is big enough to take large die cut dies, However it was too large for my tiny crafting space and limited storage space. It also came with a fairly big price tag too.
The Sizzix Texture Boutique was small and simple. It uses the standard A2 embossing folders (4.5" x 5.75" (Large enough to do the entire front of a note card.)
The Cricut Cuttlebug can accommodate the A2 and the larger 5" x 7" folders like the Big Shot, but it is not quite as big and bulky.
I had decided that for my needs, the Texture Boutique would work just fine. So, I had been keeping my eyes peeled for holiday sales.
A few weeks ago, I saw an e-mail from my local Stampin' Up! demonstrator mentioning the sale going on to make room for all the new holiday scrapbooking and stamping kits. And the Stampin' up version of the Sizzix Texture Boutique was on clearance! I got a SWEET DEAL - less than $25 even with shipping!
But, when my Boutique arrived in the mail a few days later, I realized that I had no folders to test it out with. Thankfully a friend and fellow crafter, Liz Carlin, let me come by her craft studio, and "play" with her folders and die cuts. I brought paper scraps and my embosser, and she had a huge storage bin of folders!
I am going to use this one on a flip card I'm putting together for Halloween. I tried adding some black sparkles but then changed my mind. (I haven't removed them all in this picture, as you can see.) I think it might look really cool with BLACK card stock as the base.

Well, that was 2 weeks ago. Since then, I have been scouring the the internet for deals on A2 embossing folders. My eBay find just arrived from Canada today.
It is a two folder set: Dots/Zigzags and Flowers.
I tried them out on a few different papers that I have. The first is a heavy 140 lb professional watercolor paper. (I had some small pieces that I had used to "practice" a wet into wet blending technique before applying it to a large painting. They were completely dry and had been sitting there just waiting for me to figure out what to do with them.)
The other two are Canson 98 lb mix media paper scraps. One is plain the other I used a chalk pastel to emphasize the embossing image.

Unfortunately, embossing does not make for good photography. You can't really see the texture here. Especially not on the thicker painted watercolor paper. Take my word for it, they are great!
I also found another deal on eBay a few nights ago. That one should get here early next week.
I'll post more pics then. Please be sure to check out Liz's crafting blog too. (CraftItWithLiz.wordpress.com) She is so creative with so many different materials! Until next time...Keep Calm and Keep Crafting!
Monday, August 17, 2015
Wes Waugh Teaches Wet Into Wet Watercolor
I wanted to share a watercolor workshop that I enjoyed the other day.
Mr. Wes Waugh painted Grandfather Mountain and explained his wet into
wet technique before the Newell Hendershot Watermedia Exhibition
opening reception at Sycamore Shoals Historic Site. In less than 3 hours
he created a watercolor painting start to finish. His bold color
combinations and knowledge of the medium, and subject matter is
inspiring.
Wes Waugh can be found on Youtube.


Wes Waugh can be found on Youtube for more educational watercolor presentations.
Wes Waugh can be found on Youtube.


Wes Waugh can be found on Youtube for more educational watercolor presentations.
Subscribe to:
Posts (Atom)